
Resource: Building a 3-Bin Compost System
/
Garden for the Environment compost bin at work
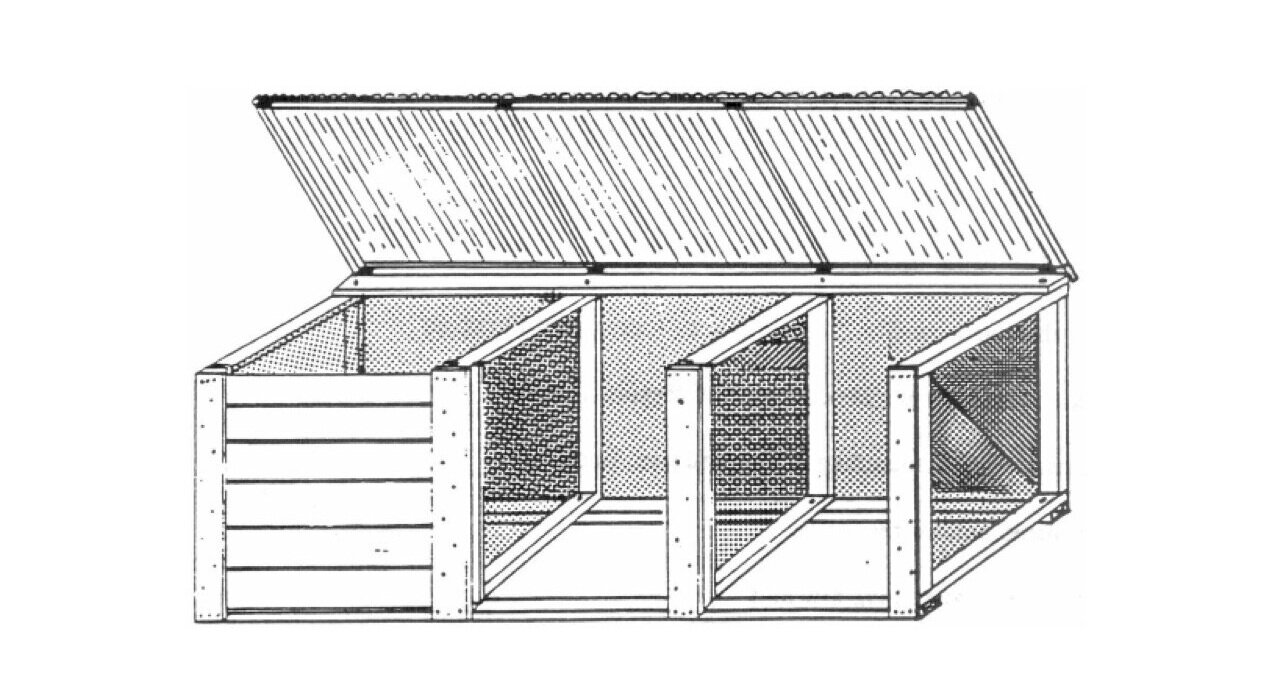
Multi-compartment composter bins allow for continuous processing of large amounts of material in batches. In a three compartment composter, material can be turned and mixed between two of the compartments, with the third compartment used for curing and storage.
A three compartment composter can be simply thought of as two additional sections attached to a single compartment unit. A simple three section unit can be constructed with seven discarded pallets lashed together. This particular design employs four identically constructed wooden frames connected to common top and bottom boards and with a single fiberglass lid. It is adapted from a design originally developed for the Community Composting Education Program in Seattle, Washington (now known as Tilth Alliance).
List of Materials
(4) 10'2x4s
(4) 12' 2x4s (or eight 6’ 2x4s)
(4) 10' 2x2s
(2) 6' 2x2s
(1) 12' 2x6s
(9) 6' 1x6s
22' of 36" wide 1/2" mesh hardwire cloth
one 10' x 2' sheet and one 8' x 2' sheet of 4 oz. corrugated fiberglass
(40) gasketed aluminum nails for corrugated fiberglass roofing
(3) 8' lengths of wiggle molding to fit corrugated fiberglass 2 3" zinc planted butt hinges for lid
(12) 1/2" carriage bolts 4” long c/w nuts
(12) 1/2" flat washers for the bolts
2 pounds of 3-1/2" galvanized nails
.5 pound of 2-1/2" galvanized casement (finishing) nails 4 flat 4" corner braces c/w screws
(4) flat 3" T braces c/w screws
carpenter’s glue
Specialized Tools
tipsnips
hand or power drill with 1/8" bit and 1/2" spade bit
3/4" socket wrench or adjustable wrench
carpenter’s square
staple gun or power stapler c/w staples
Construction Sequence
Sides and Dividers
From the 12' or 6’ 2x4s, cut eight pieces 36" long and eight pieces 32" long. Using two pieces of each on edge, form four butt jointed frames 35" by 36" (see illustration). Connect each joint with nails and glue. Cut four 37" long pieces of hardware cloth. Reinforce each edge by bending it back an inch. Center each section of cloth onto a frame (with the bent edge down against the wood) and staple the two together with a staple every 4". Tension the cloth so that it will not sag when filled with compost.

Composter Frame
Composter Frame
Cut the four 10' 2x4s into four 9' pieces. Lay two of them flat side down parallel to each other, 36" apart, outside to outside. Place the four frame pieces on the two boards, 36" dimension down. The two outside frames should be flush with the ends of the board and the two dividers should start at 35" in from each end. Mark the edges of each frame on both 9' long boards. Lay three of the frames aside.
Starting with an outside frame, align it with its markings on a base board and drill a 1/2" hole through the frame and base board into a piece of scrap wood. Secure the frame to the base board with a carriage bolt, washer and nut, but do not tighten. Feed the bolt through from the remaining three frames.
Lay another 9' top board on top of the frames aligned with their rear outside edge and mark it in the same manner as the bottom boards. Keeping the frames aligned with their markings, drill a 1/2" hole through the top board and each frame in turn. Again, feed a carriage bolt down through each hole and secure the pieces together with a washer and nut.
Check the composter frame for squareness with a carpenter’s square or by measuring the distance between outside corners. Adjust if required and tighten down all bolts with a socket or adjustable wrench. Connect the cloth to the frame with a staple every 4". Keep the tension on the cloth to prevent sagging.
Runners and Front Slats Cut four pieces 36" long from the 12' 2x6. Nail two of them flush to the top and outside front edges of the frame. Nail the other two 2x6 pieces to the front of the inside dividers, keeping them centered and flush with the top.
From two 10' 2x2s, cut six pieces 35" long for back runners. Nail these to the frames parallel to the front runners with a 1" gap for slats.
For slats, cut all nine 6' 1x6 boards into pieces 30-1/2" long.

Fiberglass lid
Fiberglass Lid For the lid frame, cut the remaining 10' 2x2 into a 9' piece and the two 6' 2x2s into four pieces 32" long. Form these pieces and remaining 9’ 2x4 into a rectangular frame 9' by 37" as per the illustration. Check for squareness and then connect the frame together using corner braces for the outside corners and T braces for the interior dividers. Pilot drill the screw holes first to avoid splitting the wood.
Lay the lid frame, brace side down, on the compartment frame with the 2x4 piece at the rear. Attach the two together with the butt hinges. Pilot drill the screw holes first to avoid splitting wood.
Cut the wiggle board molding to fit the front and back of the lid frame. Position the pieces an inch in from the sides of the frame and nail them to the top of the lid frame with the 2-1/2" casement nails. Pilot drill the nail holes first to avoid splitting the wood.
Cutting the 10' and 8' sheets of fiberglass into five pieces 37" long. Overlay each piece by at least one channel and position them on the top of the lid. Trim any overhangs at the ends to fit. Pre-drill the fiberglass and wiggle board molding with one nail hole every third hump and connect with gasketed nails.